This article explains how to add all images in a specified local folder to the Tumblr queue as individual posts.
We will use the API with OAuth2 authentication.
We will proceed according to the Tumblr API Guide.
Registering the Application
First, you need to register your app with the Tumblr API.
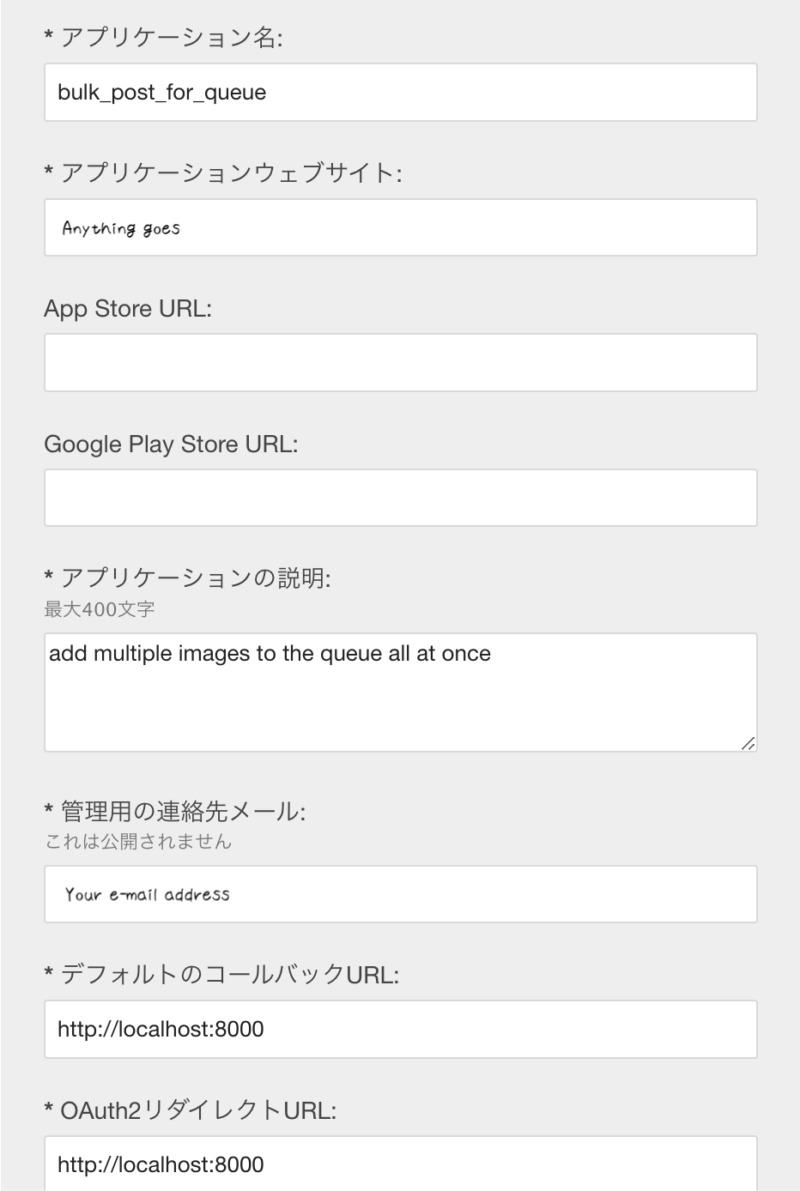
Log in and click “Register Application”.
Due to my being in a Japanese environment, the language in the diagrams is not in English. I apologize for any inconvenience this may cause and appreciate your understanding.

Application Name
You can name it anything, but here we will call it “bulk_post_for_queue”.
Application Website
Since this is not a web app, anything is fine. It won’t affect the functionality. You can use the address of your blog or social media if you have one.
Application Description
You can write anything, but here we will describe it as “add multiple images to the queue all at once”.
Administrative Contact Email
Enter your email address (not particularly used).
Default Callback URL
This is for OAuth1, so we will not use it this time, but make it the same as the OAuth2 redirect URL.
OAuth2 Redirect URL
Used in the step below.
For this occasion, setting up a simple server on localhost with http://localhost:8000 is straightforward. You cannot register 127.0.0.1 due to specifications.
If you are creating a web app, you can use its address.
If it exists, for example, https://www.google.com/ is also possible. While APIs for Google might allow non-existent addresses, Tumblr requires the address to be accessible.
In case the OAuth2 redirect URL is set to http://localhost:8000, here is an example Python code that runs a server for only 60 seconds (optional).
from http.server import HTTPServer, BaseHTTPRequestHandler
import threading

class Handler(BaseHTTPRequestHandler):
    def do_GET(self):
        self.send_response(200)
        self.send_header('Content-type', 'text/html')
        self.end_headers()
        self.wfile.write(b"Hello, world!")

def start_server(duration=60):
    port = 8000
    httpd = HTTPServer(('', port), Handler)
    print(f'HTTPServer started -> http://127.0.0.1:{port}')

    server_thread = threading.Thread(target=httpd.serve_forever)
    server_thread.start()

    shutdown_timer = threading.Timer(duration, httpd.shutdown)
    shutdown_timer.start()

    server_thread.join()

if __name__ == "__main__":
    start_server(60)  # Closes after 60 seconds
When the user grants access permission to the user’s resource server (in this case, the Tumblr account) for this app, the OAuth2 redirect URL will redirect the user with a query containing the code for obtaining the access token, like http://localhost/?code=****.
In other words, the standard browser will open {OAuth2 redirect URL}?code=***.
Register with the other fields as they are.
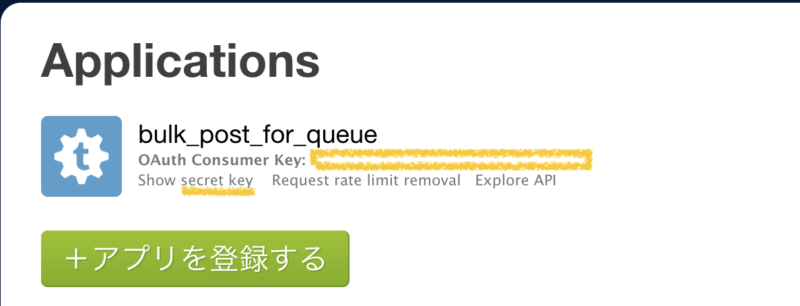
Check the app you registered.

You will need the OAuth Consumer Key and the Secret key. The Secret key is shown by clicking Show secret key.
Step 1
The OAuth2 Authorization flow – Step One
Redirect the user to Tumblr’s OAuth2 authentication endpoint.
In other words, you prompt the user to allow your application (Your application) access to the user’s Tumblr API (resource server).
The method is as follows:
Specifically, you create an address like the following and have the user access it.
https://www.tumblr.com/oauth2/authorize?client_id={Your OAuth consumer Key}&response_type=code&scope=basic%20write&state=abcdefghijklURI
www.tumblr.com/oauth2/authorize
client_id String
Consumer key
response_type
Always response_type=code.
scope
The scope of permissions for the API. This time, it is scope=basic%20write.
state
A parameter to prevent CSRF attacks. It should be a hard-to-predict string. If included in the code, it can be generated as follows:
state = hashlib.sha256(os.urandom(32)).hexdigest()About the role of state:
It might be easier to understand if you read up to the step below first.
For example, suppose the server for the OAuth2 redirect URL you set is in a state waiting for the redirect (waiting for the step below). Your application might have processed step one, or it might not have yet.
If, instead of the redirect URL for step two, a malicious attacker made the user click on their own redirect URL (including the code for the attacker’s access token issuance), your application would request an access token using the attacker’s code. Then, the attacker’s Tumblr would be authenticated as authorized, potentially sending user information using the attacker’s access token.
To prevent this, the redirect URL includes the state along with the code as a query, allowing Your application to realize it’s not the user’s code by checking the presence and value of the state. Because if it were a request sent by Your application, the redirect URL would include the state sent by Your application.
redirect_uri
Not necessary. If included, it should match the OAuth2 redirect URL.
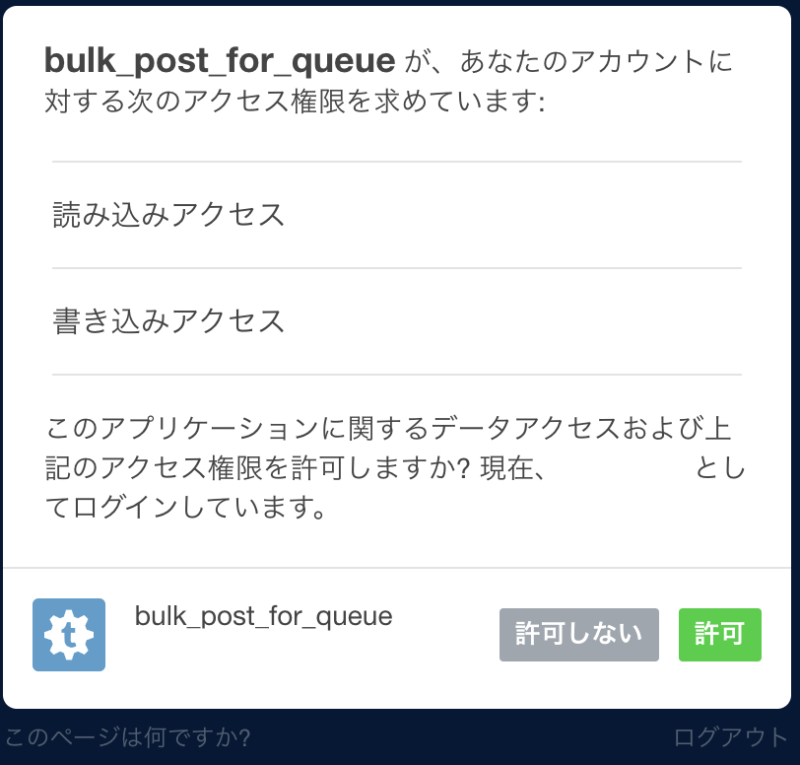
If you are not logged into Tumblr, you will be prompted to log in.
If you are logged in, you will see a message like the one below, so click Allow.

You will be redirected to the OAuth2 redirect URL you set during app registration.
Step 2
Process the callback request.
The redirect URL will contain the query parameters code and state.
Depending on the OAuth2 redirect URL you set, for example, it might look like this:
http://localhost:8000/?code=0123456789&state=abcdefghijkl#=Verify the value of the state (refer to step one’s state).
Acquire the code.
Step 3
Request an access token.
The method is as follows:
Authorization Code Grant Request
Specifically, you create a command like the one below and enter it in the command line.
curl -F grant_type=authorization_code -F code={code} -F client_id={Your OAuth consumer key} -F client_secret={Your OAuth secret key} https://api.tumblr.com/v2/oauth2/tokenURI
api.tumblr.com/v2/oauth2/token
grant_type
grant_type=authorization_code.
code
The code obtained in step 2
client_id
Your OAuth consumer key

client_secret
Your OAuth consumer secret
redirect_uri
Not necessary. If included, it should match the OAuth2 redirect URL.
An access token will be returned in the following format:
{
    "access_token": "{access_token}",
    "expires_in": 2520,
    "id_token": false,
    "refresh_token": "{refresh_token}",
    "scope": "write offline_access",
    "token_type": "bearer"
}
Step 4
Use the API.
We want to post, so
Create/Reblog a Post (Neue Post Format)
but due to the need to load local files, we prefer to use the base64 format,
Create a New Blog Post (Legacy)
we will use this.
Write in the language you are comfortable with. The official clients are as follows:
- Javascript
- Ruby
- PHP
- Java
- Python
- Objective-C
- Go
As an example, here is a minimal implementation in python:
import requests

access_token = {access_token}

posts_url = "https://api.tumblr.com/v2/blog/{blog-identifier}/post"
headers = {
    "Authorization": f"Bearer {access_token}"
}
param = {
            "type": "photo",
            "state": "queue",
            "data64": encoded_string
}

response = requests.post(posts_url , headers=headers, json=param)
{blog-identifier} is your Tumblr username, the part in https://www.tumblr.com/{blog-identifier}.
encoded_string is encoded by opening the target file and using
encoded_string = base64.b64encode(file.read()).decode(‘utf-8’)
If you replace “data64”: encoded_string with “source”: {The photo source URL}, you can post images from the web to the queue (in which case, you do not need to encode, and you can use the neue post format).
Summary
I am selling python code that consolidates all the processes described here into one on note.
With simple operations like the following, all images in the folder will be scheduled to post in the queue.
- Login to Tumblr with the default browser
- Execute the code
- Select the folder
- Click Allow
Confirmed to work with png files.


コメント